REGARDS Frontend Plugins
Presentation
REGARDS UI plugins are pieces of Javascript files bundled together that can be added dynamically into the user interface. They allow administrators creating dedicated UI parts to match project needs. There are two types of plugins:
criterion plugins, that are used in the search form of search-results module (more details here)
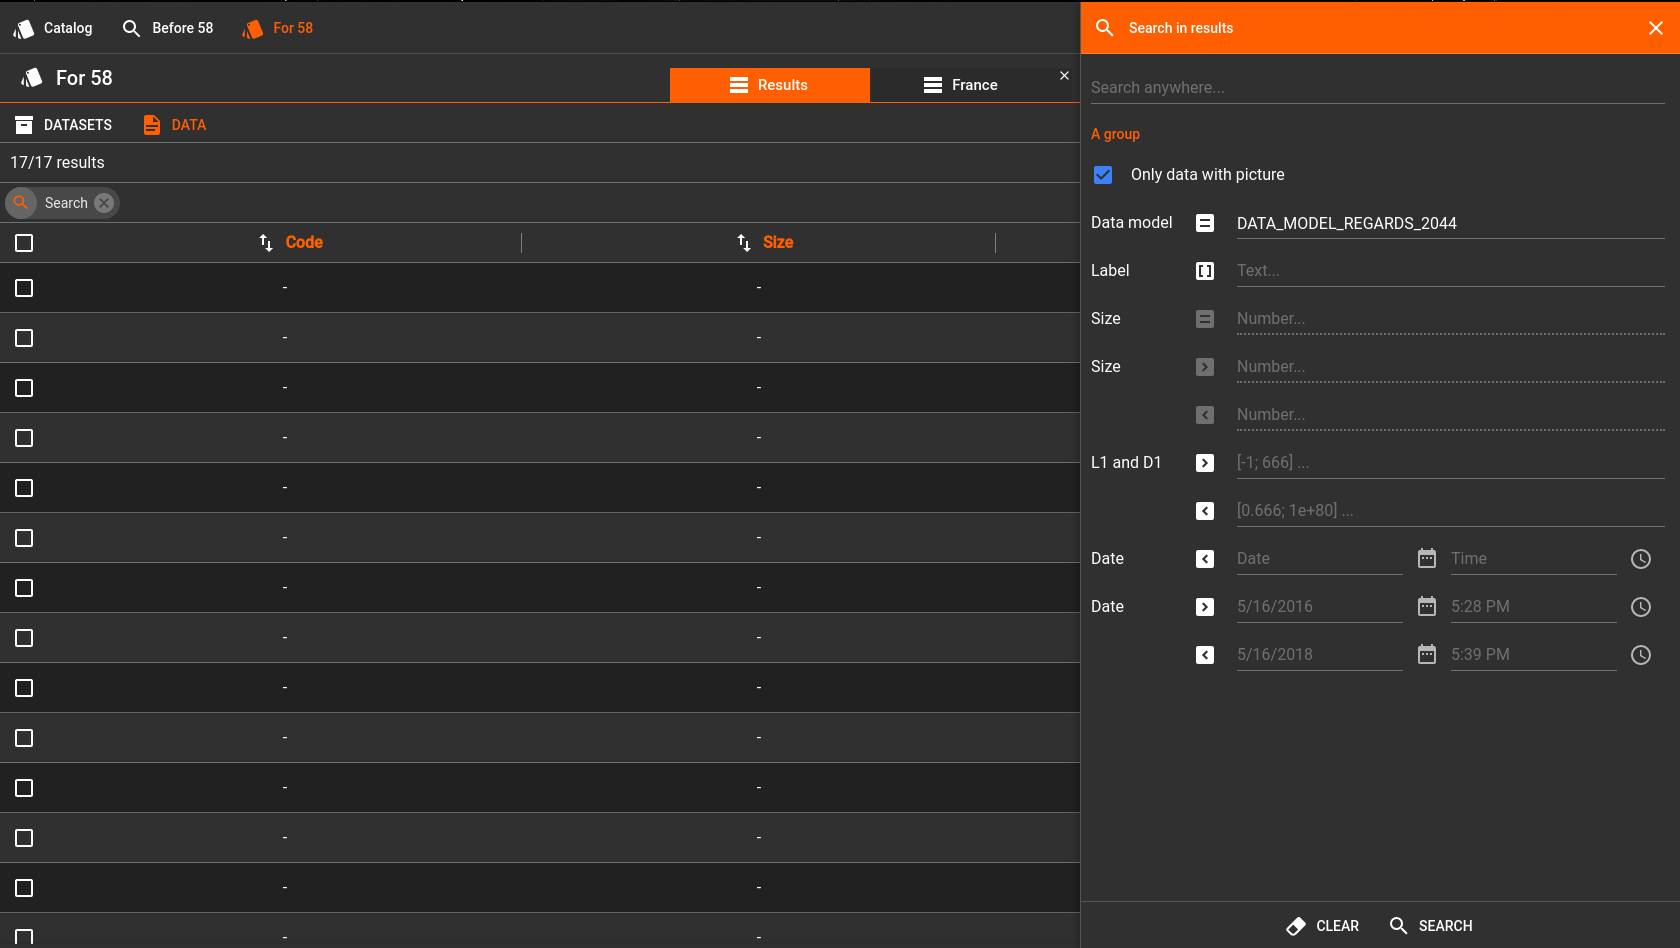 A search form example, with several criteria plugins
service plugins, that adds functionalities to an entity or a selection of entities (more detail here).
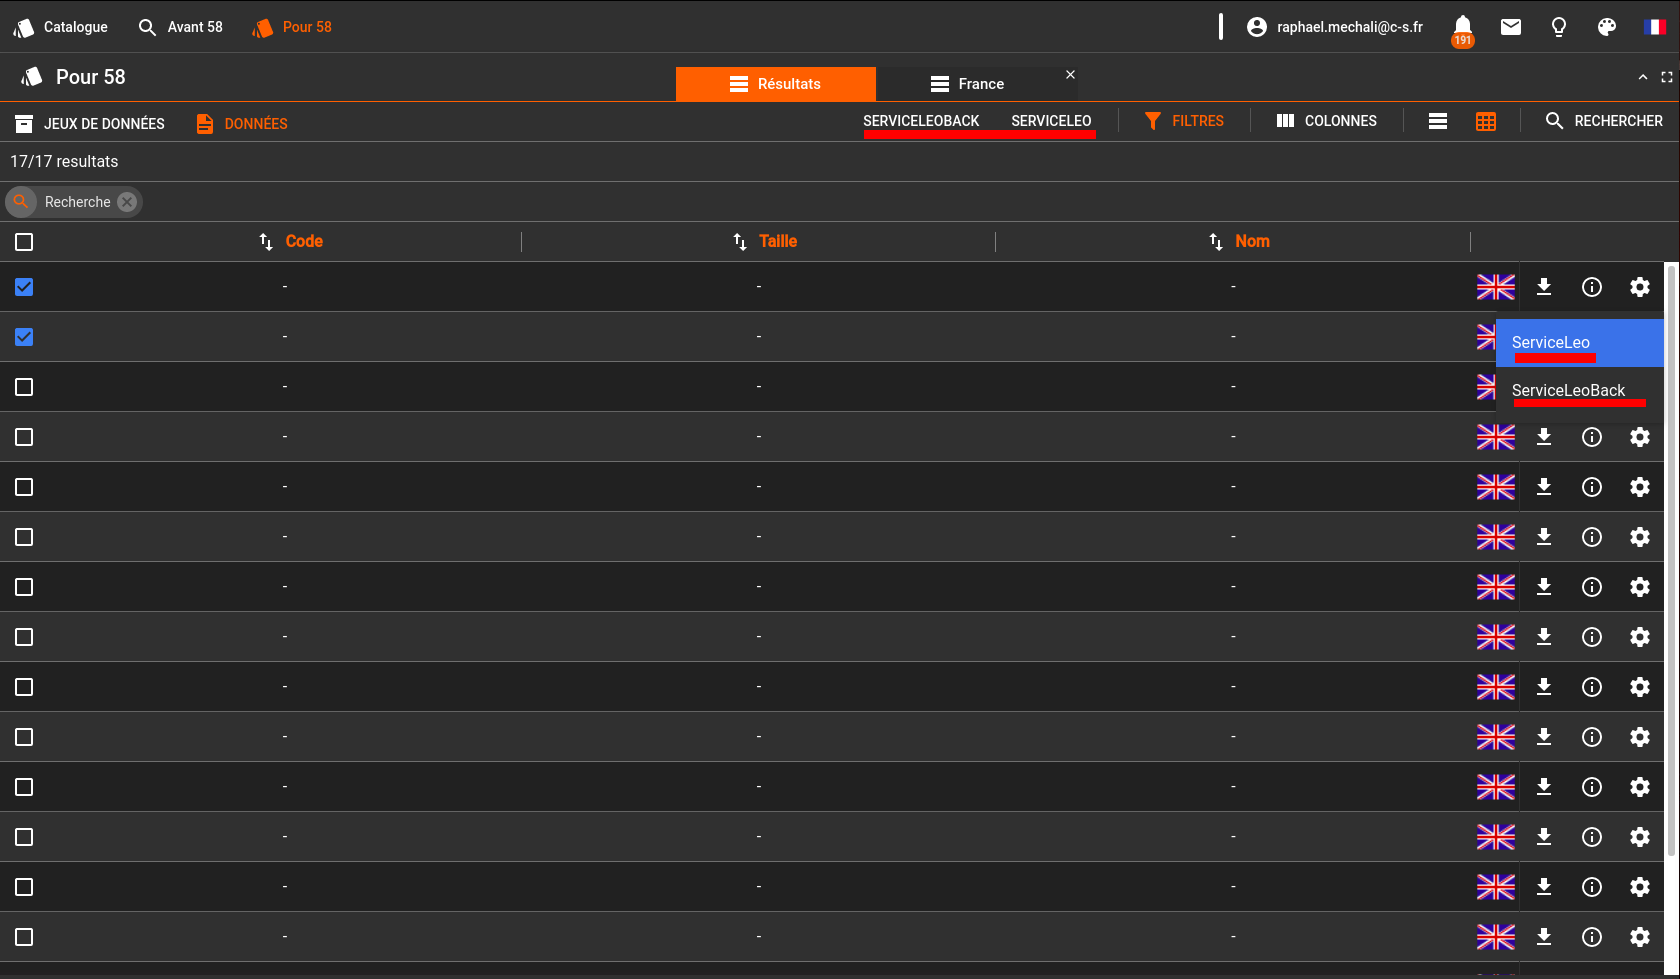 Some services example: on lines, services for one entity. On header, services for current selection.
The following sections describe common considerations and methods for all plugins.
Main principles
Each plugin:
- Is defined as an independent NPM package, in plugins folder
- Is built as a small bundle, independent of the main application
- Exposes a component view, with optional styles, messages and reducers
- Exposes a definition, allowing REGARDS interfaces to create automated configuration forms
- Is provided through a server, outside main application source code. When in develop mode, that server may be
webpack-dev-server. In production mode, it could in any public repository, or in default REGARDSplugins repository.
On a development point of view, plugins are very similar to REGARDS user modules, as they expose a view, reducers, styles and messages. However, they do not define any administration view, which is built automatically based on plugin-info.json content.
Create a new plugin
All plugin types can be created using the frontend plugin generator in webapp/yeoman/generator-regards-ui-plugin. To install and use the generator, run the following commands, in rs-frontend folder:
$ cd webapp/yeoman/generator-regards-ui-plugin
$ npm install -g
$ npm install -g yo
$ cd ../../plugins
$ yo regards-ui-plugin
Yeoman will ask you several parameters to generate the new plugin, depending on the chosen type. Once finished, the plugin folder is initialized with a basic example.
Plugin folder structure
The following folder structure is generated by Yeoman. It matches REGARDS standard NPM packages structure:
- node_modules: Installed node modules from package JSON
- reports: Built reports for coverage and tests
- src: Plugin main source folder
- clients: Plugin redux API clients
- components: Plugin React components
- containers: Plugin React containers
- i18n: Plugin internationalization
- styles: Plugin graphic styles
- main.js: Plugin exported index
- plugin-info.js: Plugin definition
- reducer.js: Redux reducers builder
- target: Built sources for plugins
- tests: Plugin tests source folder
- package.json: Npm module file describing plugin module
- README.md: Plugin README
- webpack.<mode>.js: Webpack files for plugin building
Note: node_modules, reports and target folders may not be present initially, as they are build folders. Some other folders or files, like clients or reducer.js, are not initially created. They should be added by developer when required.
Commands
Plugin package.json file holds NPM plugin commands to:
- install command (standard for any NPM package)
- compile plugin
- run plugin test
- compute plugin report coverage
- lint plugin code
In order to use those commands, rs-frontend repository must have been installed (see Frontend setup page), as it provides the core webpack DLLs, used to lower compilation duration and plugin bundle size.
1. Install plugin
Before running any other command, plugin should be installed, using command:
myPlugin:$ npm i
2. Compile plugin
The following commands compile the plugin into a usable plugin bundle:
myPlugin:$ npm run build:dev
myPlugin:$ npm run build:watch
myPlugin:$ npm run build:production
Command modes:
build:dev: Builds the bundle once for development - main application webpack dev server must be running.build:watch: Watches for code changes. Triggersbuild:devon detectionbuild:production: Builds the bundle once for production - build result can be pasted on definitive location.
3. Tests commands
The following commands run any mocha test in files matching patterns *.test.js or *.test.jsx, and stored in /tests folder:
myPlugin:$ npm run test
myPlugin:$ npm run test:watch
myPlugin:$ npm run test:coverage
Command modes:
testortest:mocha: Runs all tests once and shows tests resultstest:watch: Watches for code changes. Triggerstest:mochaon detectiontest:coverage: Runs tests and creates a coverage report
4. Lint source code
The following commands check lint rules expectations in src and tests folders, then display a report:
myPlugin:$ npm run lint
myPlugin:$ npm run lint:fix
Command options:
lint:fix: Attempts to correct issues.
5. Plugins group commands
Additionally, some commands are provided in rs-frontend/webapp/scripts folder.
webapp:$ ./scripts/build-all-plugins dev criterion
webapp:$ ./scripts/test-all-plugins services
webapp:$ ./scripts/lint-all-plugins all
webapp:$ ./scripts/compareDependencies.js ./package.json ./plugins/criterion/string/package.json
- build-all-plugins: Builds all plugins found in
rs-frontend/webapp/plugins(can be restricted with parameters) - test-all-plugins: Tests all plugins found in
rs-frontend/webapp/plugins(can be restricted with parameters) - lint-all-plugins: Lints all plugins found in
rs-frontend/webapp/plugins(can be restricted with parameters) - compareDependencies: Compares dependencies of the first and second package.json files as parameters (helps upgrading plugin dependencies versions when core dependencies changed)
Deploy plugin
To use a plugin, the following requirements must be met:
- The plugin bundle must be available. The method to use depends on development phase (see sections hereafter)
- The plugin must be declared. That declaration can be performed through REGARDS project administration interface, like shown in the picture below (User interface / Plugins)
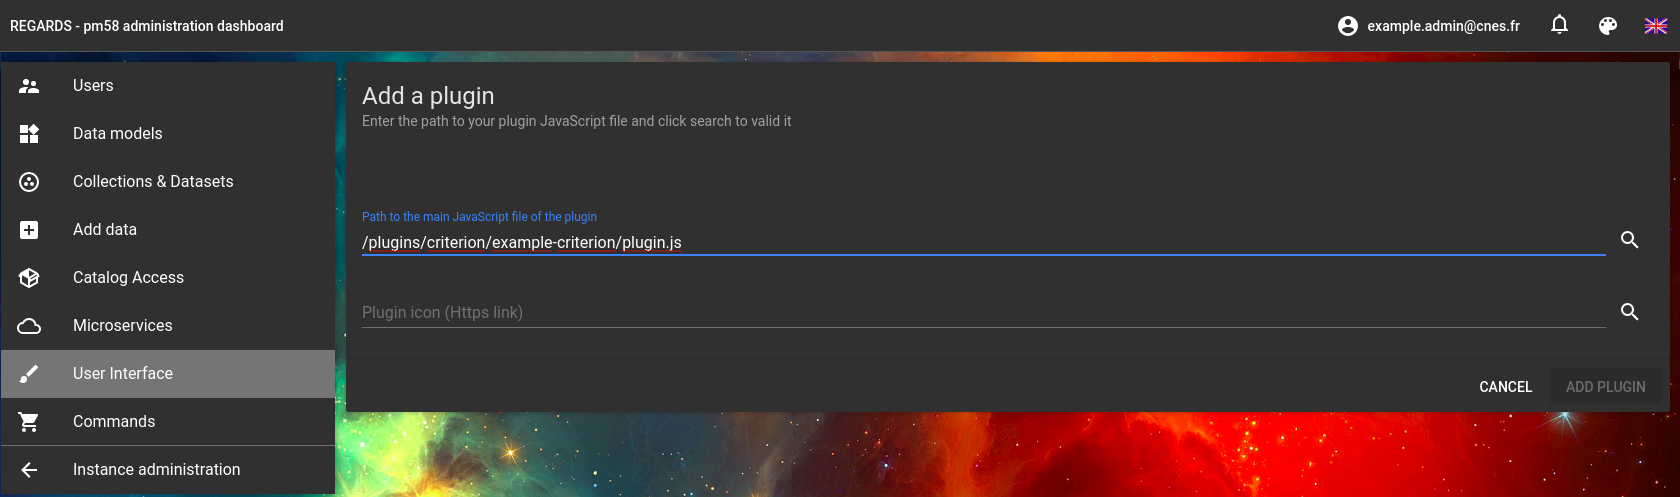 Declaring the plugin "example-criterion"
For development
The development build commands appends plugin into the running instance of webpack-dev-server, under the path /plugins/{pluginTypeFolder}/{pluginName}/plugin.js. That means main application build:watch command must be running.
Once build command has been performed, the plugin can be declared, like any other plugin (see parent section)
For production
For production, the bundle resulting of npm build:production, target/prod/plugin.js, must be pasted in a location that can be accessed through a Public URL. It is either possible to:
- Paste it in REGARDS plugins repository (depends on server configuration), then reference it using a relative URL like
/plugins/{pluginTypeFolder}/{pluginName}/plugin.js - Paste it in any other public location, then reference it by an absolute URL.
Once the bundle has been made publicly available, it is possible to declare it (see parent section)
Implementation
Plugin entry point
The entry point of a plugin is main.js file - as configured in plugin package.json. It describes all required information to load and display the plugin.
The initPlugin method is used to bundled easily that information.
initPlugin(<ReactComponent>, <pluginInfo>, <React-redux reducers builder>, <messages>, <styles>)
ReactComponent: The main React component of the pluginpluginInfo: The plugin-info.json object, holding plugin declaration.React-redux reducers builder: (Optional, can be set to null) 1 function taking plugin instance ID as parameter and returning a map of reducer field to reducer function (see Redux management section)messages: Internationalization messages as an object with languages as keys (en|fr), then message keys as sub keys and message value by locale as value (see example below).styles: an object like{ styles: buildStylesMethod}, where buildStylesMethod is a function taking current muiTheme as single parameter and returning plugin styles (see modules documentation for declaring and using module theme).
plugin-info.json
That file is used by the plugin loader to define the configuration required by the plugin.
{
  "name": "my-plugin",
  "description": "It is my plugin",
  "version": "1.0.0",
  "author": "Someone",
  "company": "Some company",
  "email": "someone@some-company.com",
  "url": "www.my-plugin-is-awesome.com",
  "license": "GPL-V3",
  "type": "CRITERIA",
  "conf": {}
}
Notes:
typefield marks the plugin type (criterion or service plugin)conffield content is specific to the plugin type
Plugin configuration view
Plugin configuration forms are automatically created by the main application, using plugin-info.json. Hence there is no need for configuration views in plugins.
Plugin user view
Main react component, exported as the first parameter of the initPlugin method, within main.js, is the first displayed component after loading.
That component receives, no matter the plugin type, the property pluginInstanceId, that is a unique id for that instance of plugin
Notes:
- Other plugin properties are specific to the plugin type, see criterion or service plugin pages for more detail.
- Component is instantiated with its own intl and theme, using current context (see Internationalization and Theme pages for more detail
Redux management in plugins
Plugins can, optionally, export reducers to be able using and updating their own space in Redux store. In REGARDS, components usually manage a static Redux store space. However, as one plugin can be instantiated many times, such system would result in all plugin instances sharing the same Redux store space, and thus the same state. Therefore, plugins have to address a dynamic Redux store.
For that reason, initPlugin expects to receive an optional buildReducer method, and not a static reducers map. That method must return, given the unique pluginInstanceId, the plugin reduce methods map.
Building reducers
The plugin buildReducer function aims at providing a different dynamic reducers for each plugin instance. Therefore it must use pluginInstanceId parameter to generate unique reducers namespaces. That way, the system ensures plugin instance 1 will not reduce plugin instance 2 Redux actions and reciprocally.
Build plugin reducers function example (might be placed in reducer.js file):
// ...
/*
 * Build reducer function
 * @param {string} pluginInstanceId plugin instance ID, must be used to generate unique namespaces and store paths
 * @return {*} reducers configuration for plugin instance
 */
export default function buildReducer(pluginInstanceId) {
  return {
    myModel1: getMyModel1Client(pluginInstanceId).reducer,
    myModel2: getMyModel2Client(pluginInstanceId).reducer,
  };
}
An example is available in enumerated criterion, at path webapp/plugins/criterion/enumerated/src/reducer.js
Building actions and selectors
Redux actions must also be dynamically built using pluginInstanceID, since the namespace is used by plugin reducer to filter actions it should handle or ignore.
Furthermore, as the redux store space are separated, the selectors must also be dynamic. The selectors path contains the two elements below:
- First path element:
{Plugin name}.{Plugin instance ID}where plugin name matches name from plugin-info.json and plugin instance ID is the value provided to both buildReducer method and main component. - Second path element is the reducer map key in the value returned by buildReducer method (myModel1 or myModel2 in example before)
Since the plugin instance ID is provided to the main component, it is possible to write the following code:
  class MyPluginContainer extends React.Component {
  static mapStateToProps(state, { pluginInstanceId }) {
      return {
        myValue: new MyModel1Selectors(pluginInstanceId).getMyValue(state)
      }
    }
However, that approach is considered a bad practice, as selectors and actions would be instantiated each time mapStateToProps and mapDispatchToProps are called, what consumes lot of browser memory.
To solve that issue, REGARDS provides the @regardsoss/plugins-api/PluginsClientsMap class, that is a lazy clients map. Using it avoids creating new actions and selectors instances each time mapStateToProp and mapDispatchToPropsToProps are called.
  class MyPluginContainer extends React.Component {
    // That map will hold the instances of actions and selectors
    static CLIENTS_MAP = new PluginsClientsMap()

    static mapStateToProps(state, { pluginInstanceId }) {
      const mySelectors = MyPluginContainer.CLIENTS_MAP.getClient(buildMyClient, pluginInstanceId).selectors
      return {
        myValue: mySelectors.getMyValue(state)
      }
    }

    static mapDispatchToPropsToProps(dispatch, { pluginInstanceId }) {
      const myActions = MyPluginContainer.CLIENTS_MAP.getClient(buildMyClient, pluginInstanceId).actions
      return {
        dispatchSomething: () => dispatch(myActions.doSomething())
      }
    }
Note: The PluginsClientsMap is a simple tool that buffers a map on pluginInstanceId => builder => builtValue. It is very straightforward code and can be replaced by a locally coded buffer if you prefer. In order to work correctly, it requires clientBuilder instance - buildMyClient in previous example - to be a constant JS function reference for a single client.